We now belong to a homeschool co-op. First time ever. Not only do we belong to the co-op, I offered to help teach. When I saw the list of classes there were many things that I knew I would enjoy, but I was unsure what I could really teach well. And then I saw there was an art class for teens.
Inspiration struck.
I talked with one of the leaders and she told me that projects were up to me and to go for it.
So, I did.
My mind has been racing as to what all I want to do for this class. I love so many types of arts and crafts projects and dabble in so many different ones, but I wanted to pick some things that might grasp the students attention to what they could do too.
The first week we began painting a version of Van Gogh’s “Starry Night” I’ll have to share a picture of that when we are all finished.
We have a budget for the class, and I’m trying to pick really fun projects to do, and trying to cut expenses as much as possible, so I went to my Facebook friends and asked them to help out.
I decided if I could find enough old wooden picture frames with the glass, we could make these into hanging, sun-catching, stained glass projects.
I’ve had several responses and I’m so thankful for them. We almost have as many as we will need for our projects.
What you will need if you would like to try this project for yourself?
A glass of some type. You will need to be able to lay this flat to work on, so if you are wanting it in your window, then you need to find an old frame like this or maybe a blank sun catcher, etc.
Liquid leading (I’ve attached a link below)
Get online and google stained glass coloring pictures… you will see there are TONS out there. I knew I wanted to do a pumpkin, but there are seriously so many out there, you will have a variety to choose from.
And Gallery Glass Stained Glass Paints in the colors you need.
I just ordered a variety pack, like this.
Lay your cleaned glass over the picture you printed out. Open your liquid leading and begin tracing the picture. I’ve watched where some who are better at this than me hold the bottle up and allow the leading to fall into a nice rounded beading… I wasn’t brave or good enough at it, so I just followed and allowed it to make nice thick, raised lines. And that works just fine.
Once you get your leading done. You need to let this dry for at least 8 hours.
That was the hard part for me!
That was the hard part for me!
Next get your window color and begin to fill in. You don’t want to go TOO thick, but it needs to fill the area.
Like so. Right now it looks really opaque and thick, but it will dry clear after a few hours.
I didn’t want to make a perfectly orange pumpkin. So I decided to do a little streaking in it. I used yellow, a couple of different greens, an amber, to make it a little different.
When you use your color what is suggested is that you go around the area to fill with the color, lining it against the leading. Then fill in the center.
When you use your color what is suggested is that you go around the area to fill with the color, lining it against the leading. Then fill in the center.
This is what it looked like when I finished filling in the color. You can see I streaked it slightly in other areas on the pumpkin too. Just a little.
After about 4 hours I wanted to come back in and do some filling in around the pumpkin to give it that frosted look. This is NOT dry yet, but I was careful.
If you are going to try this project with a class, make sure you plan for at least a couple of days.
For us, we will lead the first day we start it, and then we will fill in with paint on the next. So from start to finish it will be 3 classes for them.
If you are going to try this project with a class, make sure you plan for at least a couple of days.
For us, we will lead the first day we start it, and then we will fill in with paint on the next. So from start to finish it will be 3 classes for them.
I used the color Hologram Shimmer to fill in around the pumpkin. Gallery glass makes several different colors to use for this part, but I liked the idea of a shimmer.
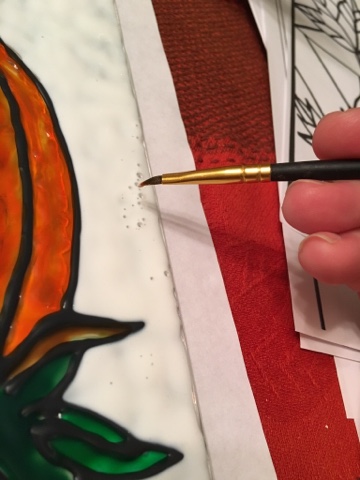
I used a teeny paintbrush to help get in corners or to help pop any air bubbles.
Ready to dry completely.
And here is the finished, dried project.
I. Love. It.
All I have to do now is get a small chain to attach to the frame, and I’m ready to hang it in my window.
I. Love. It.
All I have to do now is get a small chain to attach to the frame, and I’m ready to hang it in my window.
I hope you enjoyed this as much as I did. Now get out there and make something pretty!


